Webhook MQQT
Integration MQQT webhooks with Amazon MQQT or Azure IoTHub
Create or edit a webhook
By configuring a webhook we will make the platform send data to a configurable server end point.
- If you click the
 button.
The following form appears when you select the MQQT protocol:
button.
The following form appears when you select the MQQT protocol: 
Figure 1. Configuration webhook MQQT Table 1. Callback information webhooks Item Description Protocol Select the protocol: MQTT Provider Select the provider: the IoT hub provider. We currently support Amazon AWS and Microsoft Azure End point Select the end point: host name of the end point. A typical example for AWS IoT core service is given. For Azure, the name is your custom subdomain on azure-devices.net: <subdomain>.azure-devices.net Topic/device Select the topic/device: name of the topic (AWS) or device (Azure) to which messages should be published. Azure is not positioned as a brokerage platform but expects single device communication. As a workaround you have to create a virtual device and handle the per device routing on the Azure side. Certification file Certificate file (cert.pem): the certificate file for the mutual SSH authentication. See https://docs.aws.amazon.com/iot/latest/developerguide/device-certs-create.html for AWS, https://learn.microsoft.com/en-us/azure/iot-hub/iot-hub-x509ca-overview for Azure Private key file Private key file (key.pem): the private key file for the mutual SSH authentication, see certifiction key file Tags Add a list of device tags. If not empty, only messages for tagged devices will be sent Script an (optional) transformation script to transform the original message payload in a new payload. This is useful when the webhook server expects a certain predefined payload format. See further information below. Enabled enable or disable webhook Data types Select the data type out of the list. See further information below. Test Test correct behavior. This will send a demo message and show successful response code 200 OK
Script
The script should be written in javascript and should evaluate to the expected new format. There is 1 input variable that can be used: message. The result of your script is the same as what you would get by calling the javascript eval() method on your script. It will evaluate to the last entered statement in your script. As an example
As an example: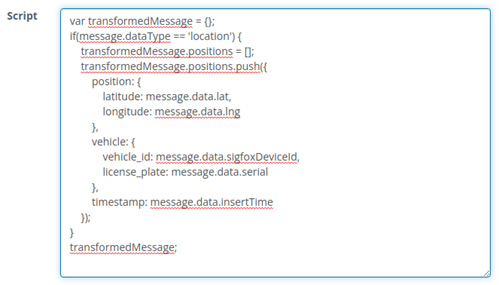
In this case transformedMessage is calculated and repeated as a statement on the
last line. The result may look something like:![]()
Data types
The following data types are support:
| Data type | Description |
|---|---|
| all | Activity, location, battery updates |
| activity | Sent when there is a device activity (START, STOP, OTM) |
| anchorscan | Sent for tag when it is scanned by an anchor |
| beaconscan | Sent when a device scans a beacon |
| button_press | Sent when button is pressed (for trackers with physical anti-tamper alert |
| device_temperature | Temperature information for device (not a dedicated event) |
| location | Sent when the device fixes a location |
| maintenance_value | Sent when the maintenance parameter value changes |
| network_location | Sent when the device registers a network location |
| orientation_event | Sent when the orientation state changes |
| orientation_state | Sent when the orientation state changes |
| pt100_temperature | Sent when the PT100 sensor registers temperature (periodic or alert) |
| sensor_data_ext | Sent when external sensor data is received by the device |
| sigfox_network_signal_levels | Sigfox network information (base stations and RSSI levels) associated with each message |
| status | Sent when the online/offline status of the device changes |
| third_party_data | Sent when third party data is received for a device |
| tilt | Sent when a tilt event occurs on the device |
| wifiscan | Sent when wifi access points are scanned by the device |