Add custom data
Explanation on how to create custom data channels and on how to update the data via the mobile phone.
If you have relevant information available on the asset where the tracker is attached to in another system (for example, your company's ERP system), it can be meaningful to push this data also to the tracker information that is available on the platform. This information can for example contain the shipment information of the asset.
Custom data can also be used to add information uploaded via the mobile app. For example, when you want to add a picture of a damaged asset or a signature via the Sensolus mobile app.
To be able to add custom data to the trackers on the Sensolus platform you should first create custom data channels. A channel is the definition of the business data elements and structure.
- Data structure: define the fields and their type (number, text, enumeration, list, image ..)
- Validation rules: define the valid values of a field
- Default values: define the default value for a field
- Labels: define how the label of the fields that will be used in the interfaces, search filters, etc.
All injected data will be validated against the schema to ensure compliance with the business rules.
Go to ![]() Admin → Developers → custom data to add custom data channels to
your trackers.
Admin → Developers → custom data to add custom data channels to
your trackers.

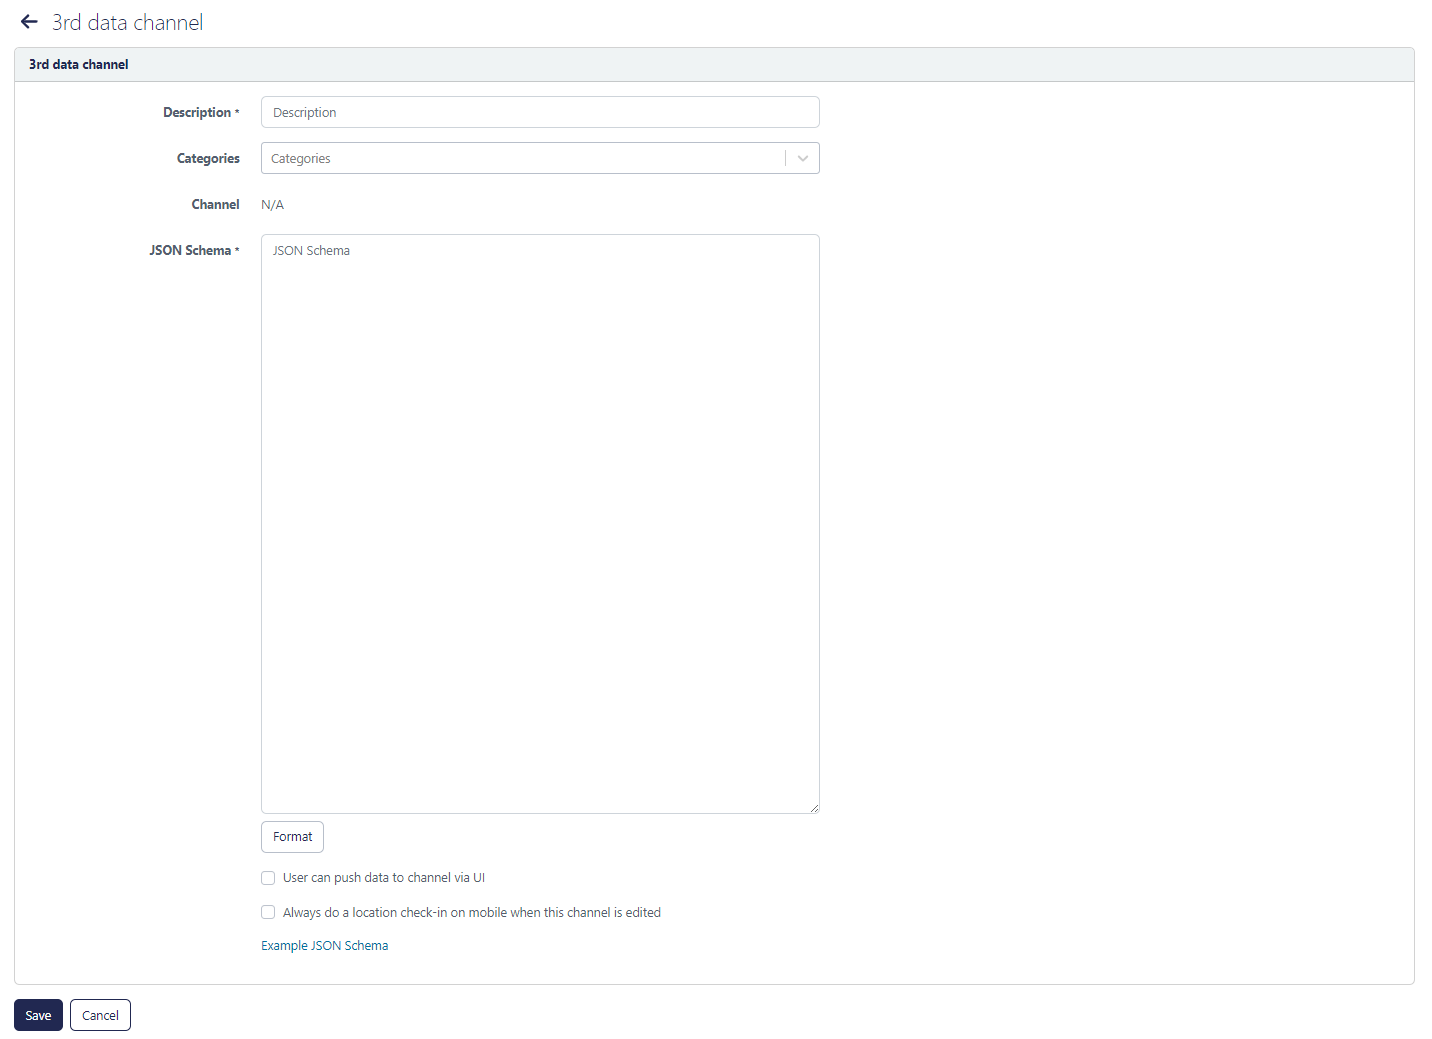
to create a new custom data channel. The following screen appears:
| Field name | Description |
|---|---|
| Description | The meaningful name you give to the channel (for example: shipment data, repair signoff, ..) |
| Categories | Select one of the two types: Device = trackers, tag trackers or sensors Infrastructure = zone anchors, geobeacons,... |
| Channel | N/A: The channel key is automatically assigned when you create a new channel. |
| Choose sample schema (optional) | Here you find some example JSON schema. Is you are not used to write JSON best
is to start with one of these. The provided sample schema are::
Take a look on this page below to see how some of the examples will look like on the platform and the mobile app. We also explain how upload of a PDF looks like, although no sample schema is available for this. |
| Format JSON schema | By pushing this button the schema you created will be formatted correctly. |
| JSON schema specification | A link to an external website to learn more about JSON schema |
| User can push data to channel via UI | Selection box to give users the right to push data to the channel via UI. This
is related to the use of the Sensolus mobile app to for example add a signature
after maintenance is done. Or to attach a picture of damage to the asset via the
mobile app (via a mobile form) Note: If this box is checked,
all organization editors and administrators have the rights to update custom data
(viewers don't) Note: Create a custom user profile if you want
channel update rights on user specific users. The roles related to custom
channel rights are:
|
| Always do a location check-in on mobile when this channel is edited. | When you select this function the tracker will always look for a location fix when the user pushes data to the channel via UI (which means via the mobile phone). |
Do not forget to click to  to save
the created custom data channel.
to save
the created custom data channel.
- "description": description
- "title": label
- "type": type of the field: boolean, string, number, integer, enum, image
- "order": order in the property list
- "minimum": in case of number - minimum value
- "maximum": in case of number - maximum value
- "exclusieMinimum": in case of number - maximum value
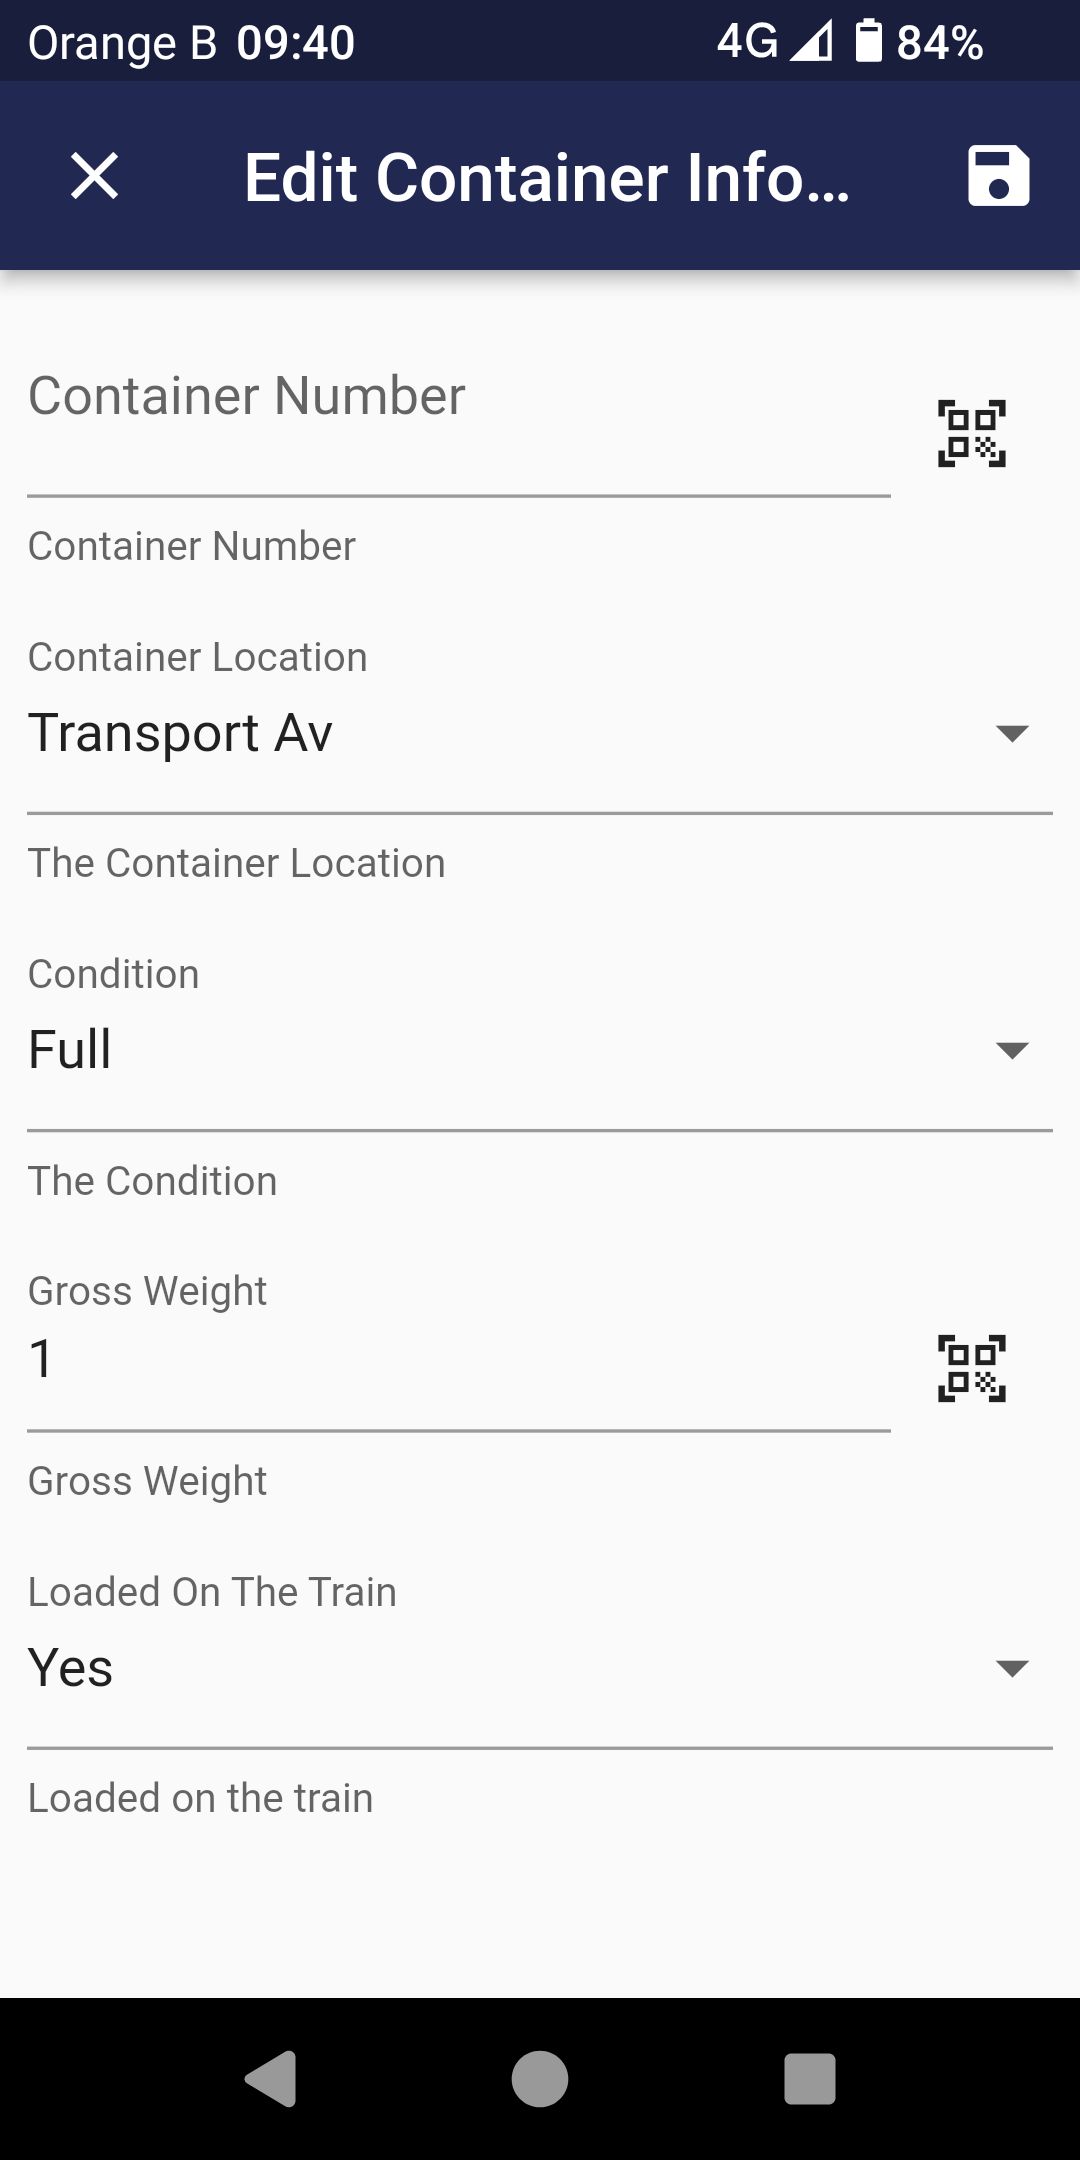
Example to report on the container load and transport via mobile app
{
"$schema": "http://json-schema.org/draft-04/schema#",
"description": "Container Information",
"additionalProperties": false,
"title": "Container Information",
"type": "object",
"properties": {
"Container Number": {
"description": "Container Number",
"type": "string",
"order": 1
},
"Container Location": {
"type": "string",
"enum": [
"Transport Av",
"Victoria Road"
],
"description": "The Container Location",
"order": 2
},
"Condition": {
"type": "string",
"enum": [
"Full",
"Empty",
"Maintenance"
],
"description": "The Condition",
"order": 3
},
"Gross Weight": {
"description": "Gross Weight",
"type": "integer",
"order": 4
},
"Loaded On The Train": {
"type": "string",
"enum": [
"Yes",
"No"
],
"description": "Loaded on the train",
"order": 5
}
},
"required": [
"Container Number",
"Container Location",
"Condition"
]
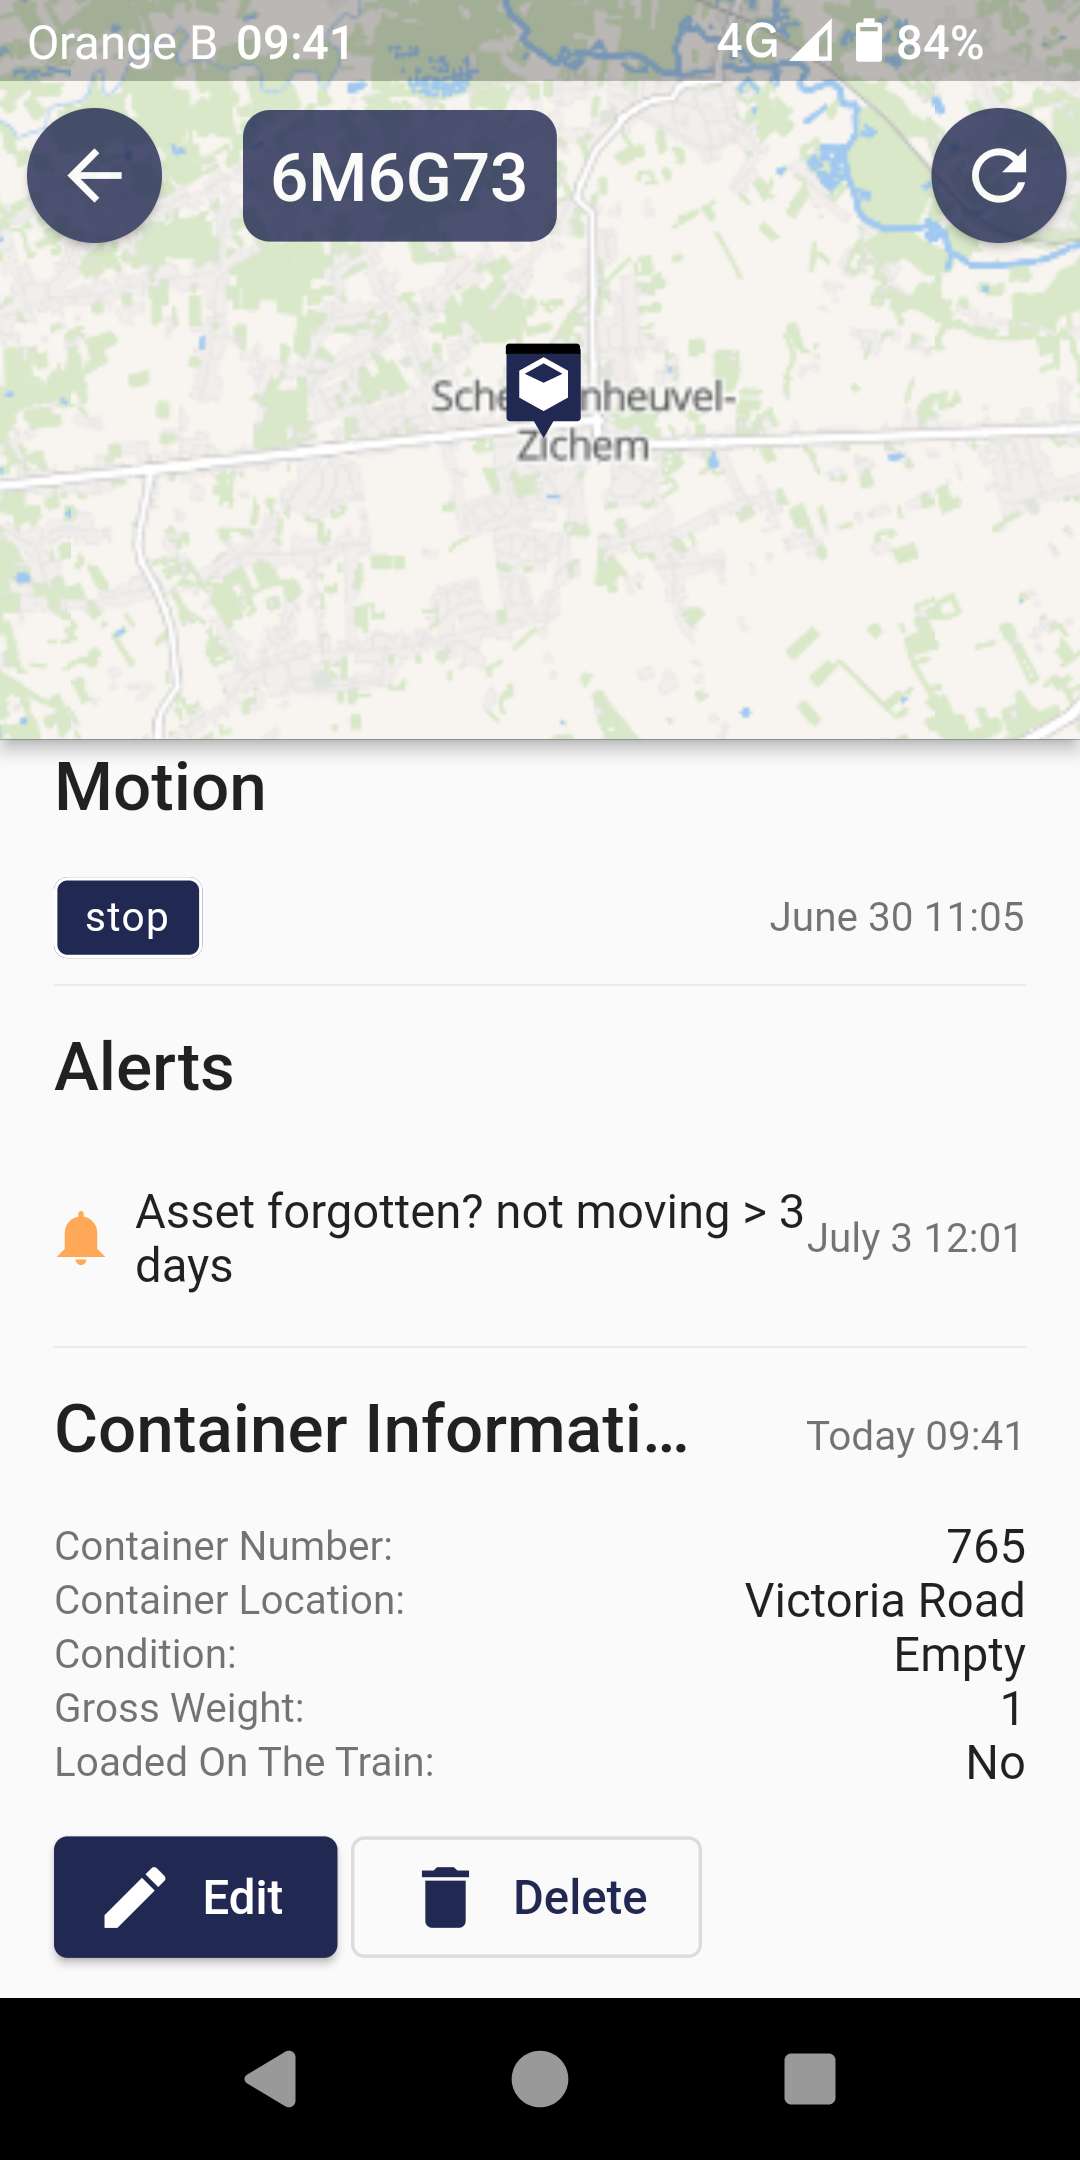
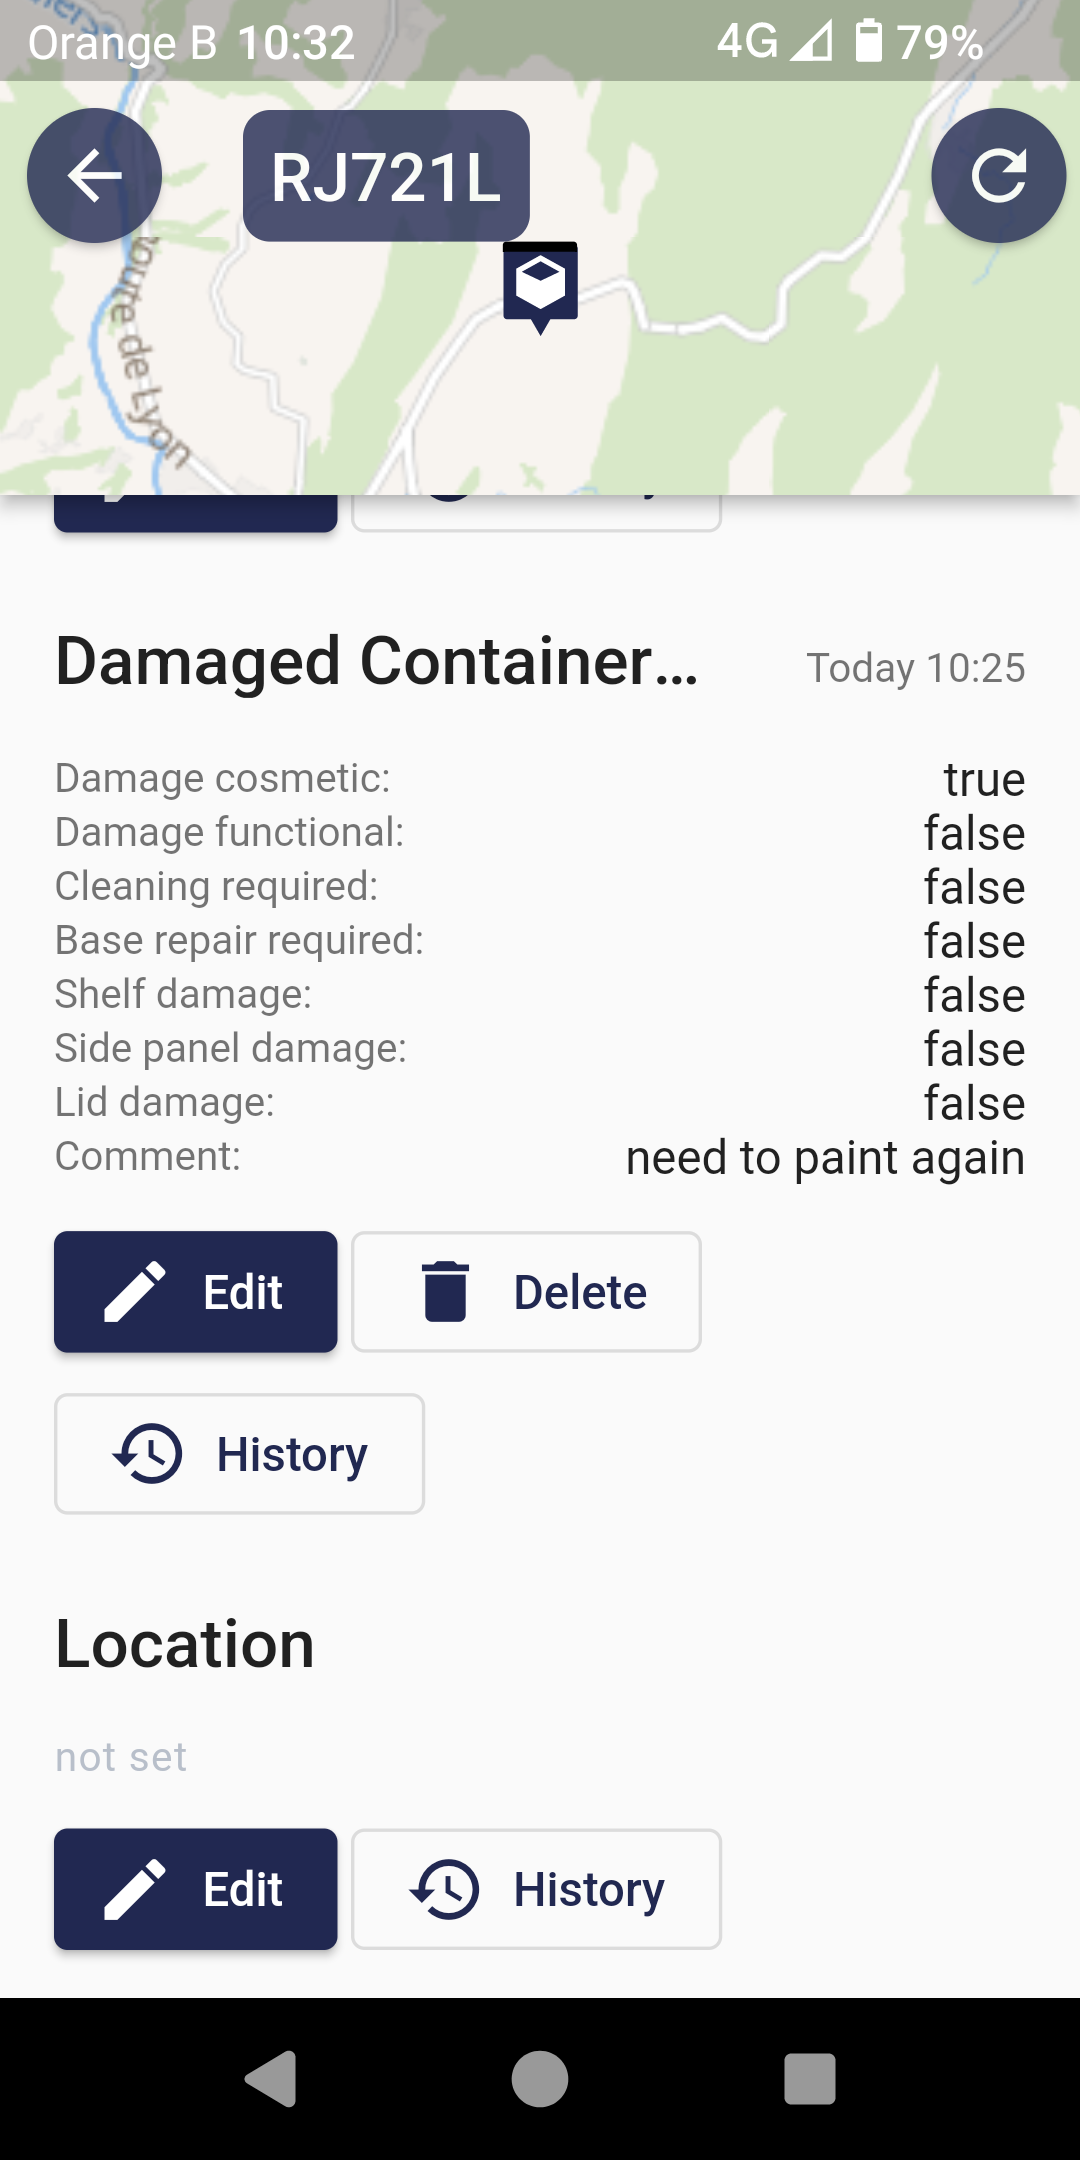
}On the mobile phone the interaction looks like this:

Don't forget to click ![]() to save the
information
to save the
information
Example to report on the container damage via mobile app
{
  "$schema": "http://json-schema.org/draft-04/schema#",
  "description": "Damaged Container Reporting",
  "title": "Damaged Container Reporting",
  "type": "object",
  "properties": {
    "Base repair required": {
      "description": "Container that requires base repair",
      "type": "boolean",
      "order": 4
    },
    "Cleaning required": {
      "description": "Container that requires cleaning",
      "type": "boolean",
      "order": 3
    },
    "Shelf damage": {
      "description": "Container with shelf damage",
      "type": "boolean",
      "order": 5
    },
    "Damage cosmetic": {
      "description": "Container with cosmetic damage",
      "type": "boolean",
      "order": 1
    },
    "Damage functional": {
      "description": "Container with functional damage",
      "type": "boolean",
      "order": 2
    },
    "Side panel damage": {
      "description": "Container with side panel damage",
      "type": "boolean",
      "order": 6
    },
    "Lid damage": {
      "description": "Container with lid damage",
      "type": "boolean",
      "order": 7
    },
    "Comment": {
      "description": "Describe the damage",
      "type": "string",
      "order": 8
    }
  },
  "required": [
    "Damage cosmetic",
    "Base repair required",
    "Damage functional",
    "Shelf damage",
    "Cleaning required",
    "Side panel damage",
    "Lid damage"
  ]
}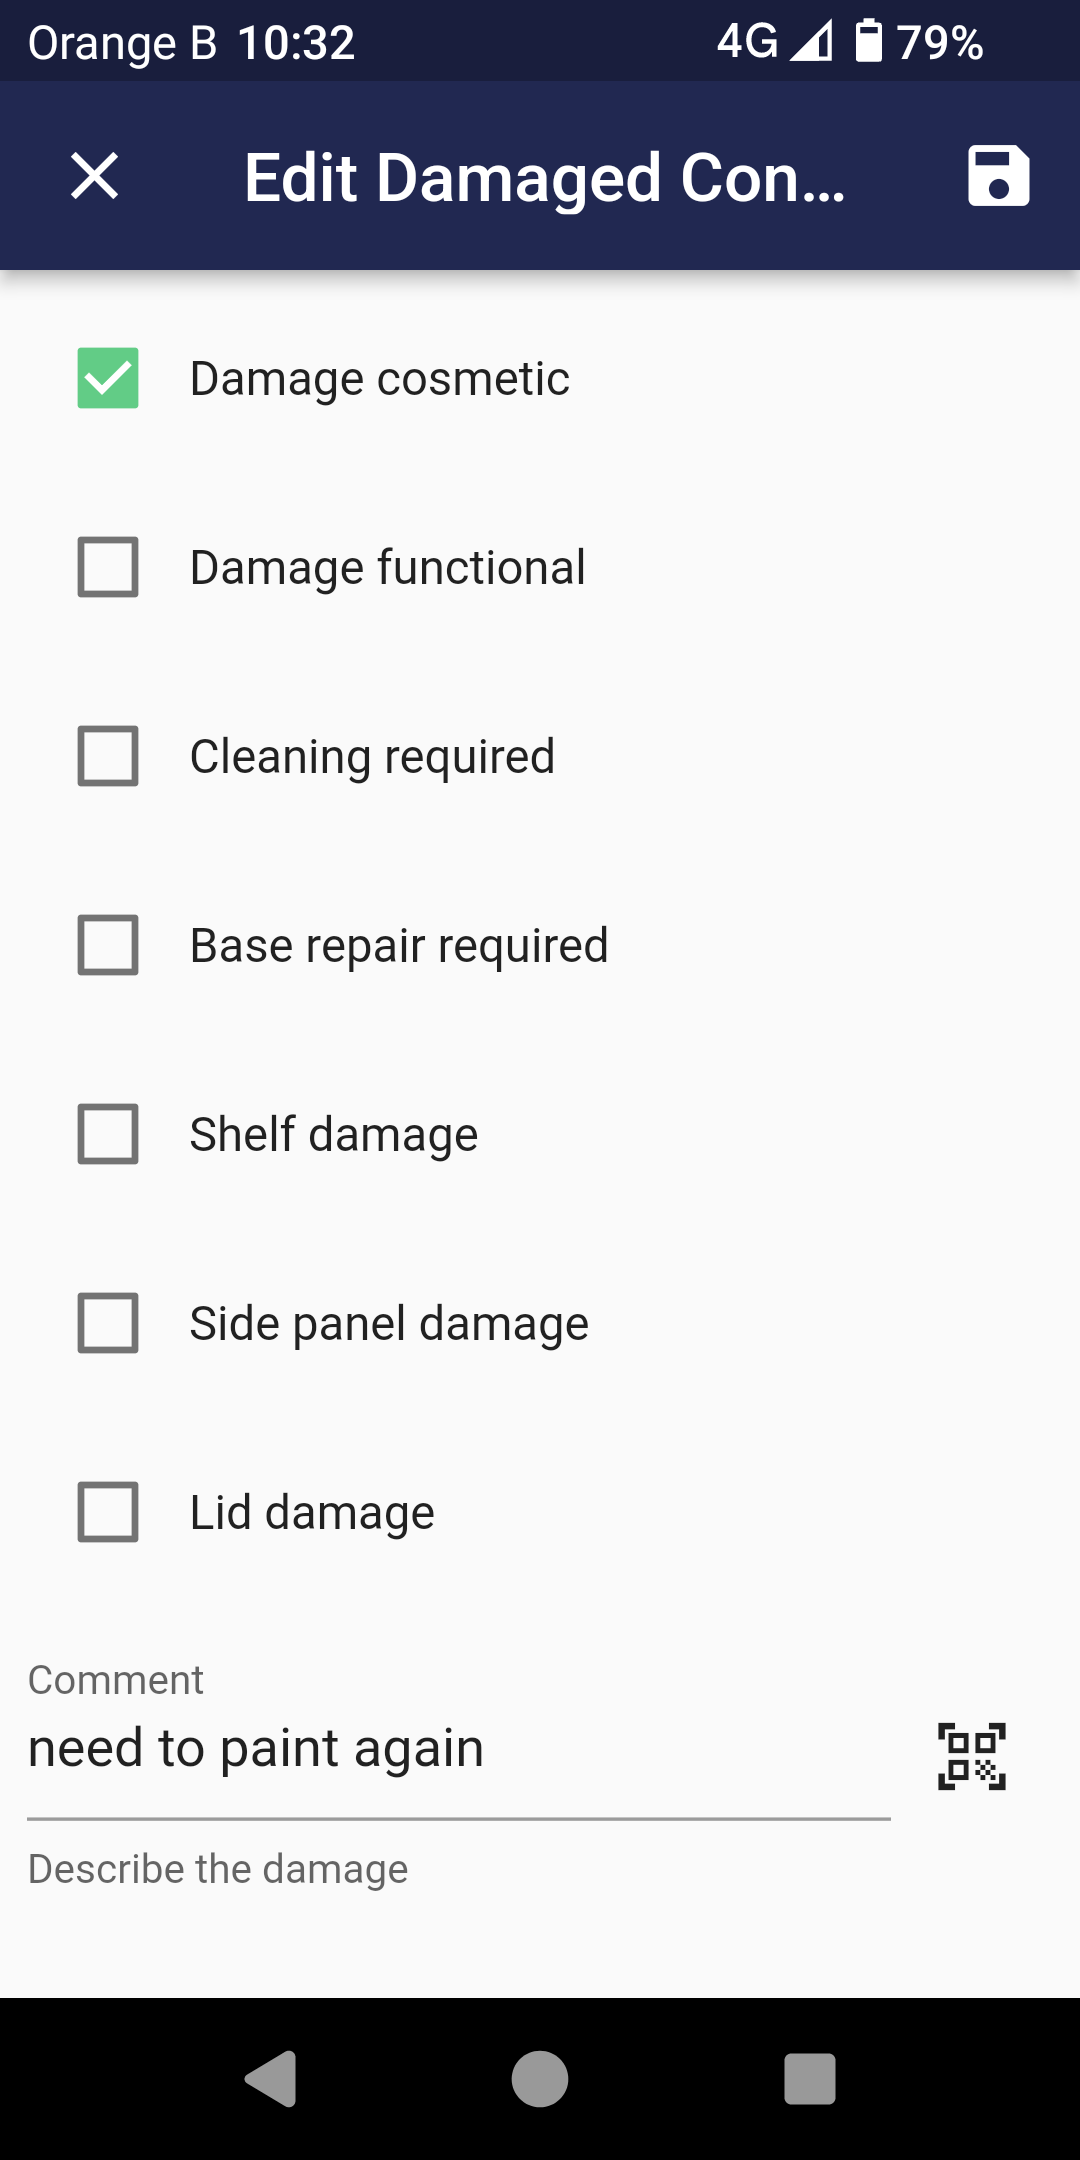
Don't forget to click ![]() to save the
information
to save the
information
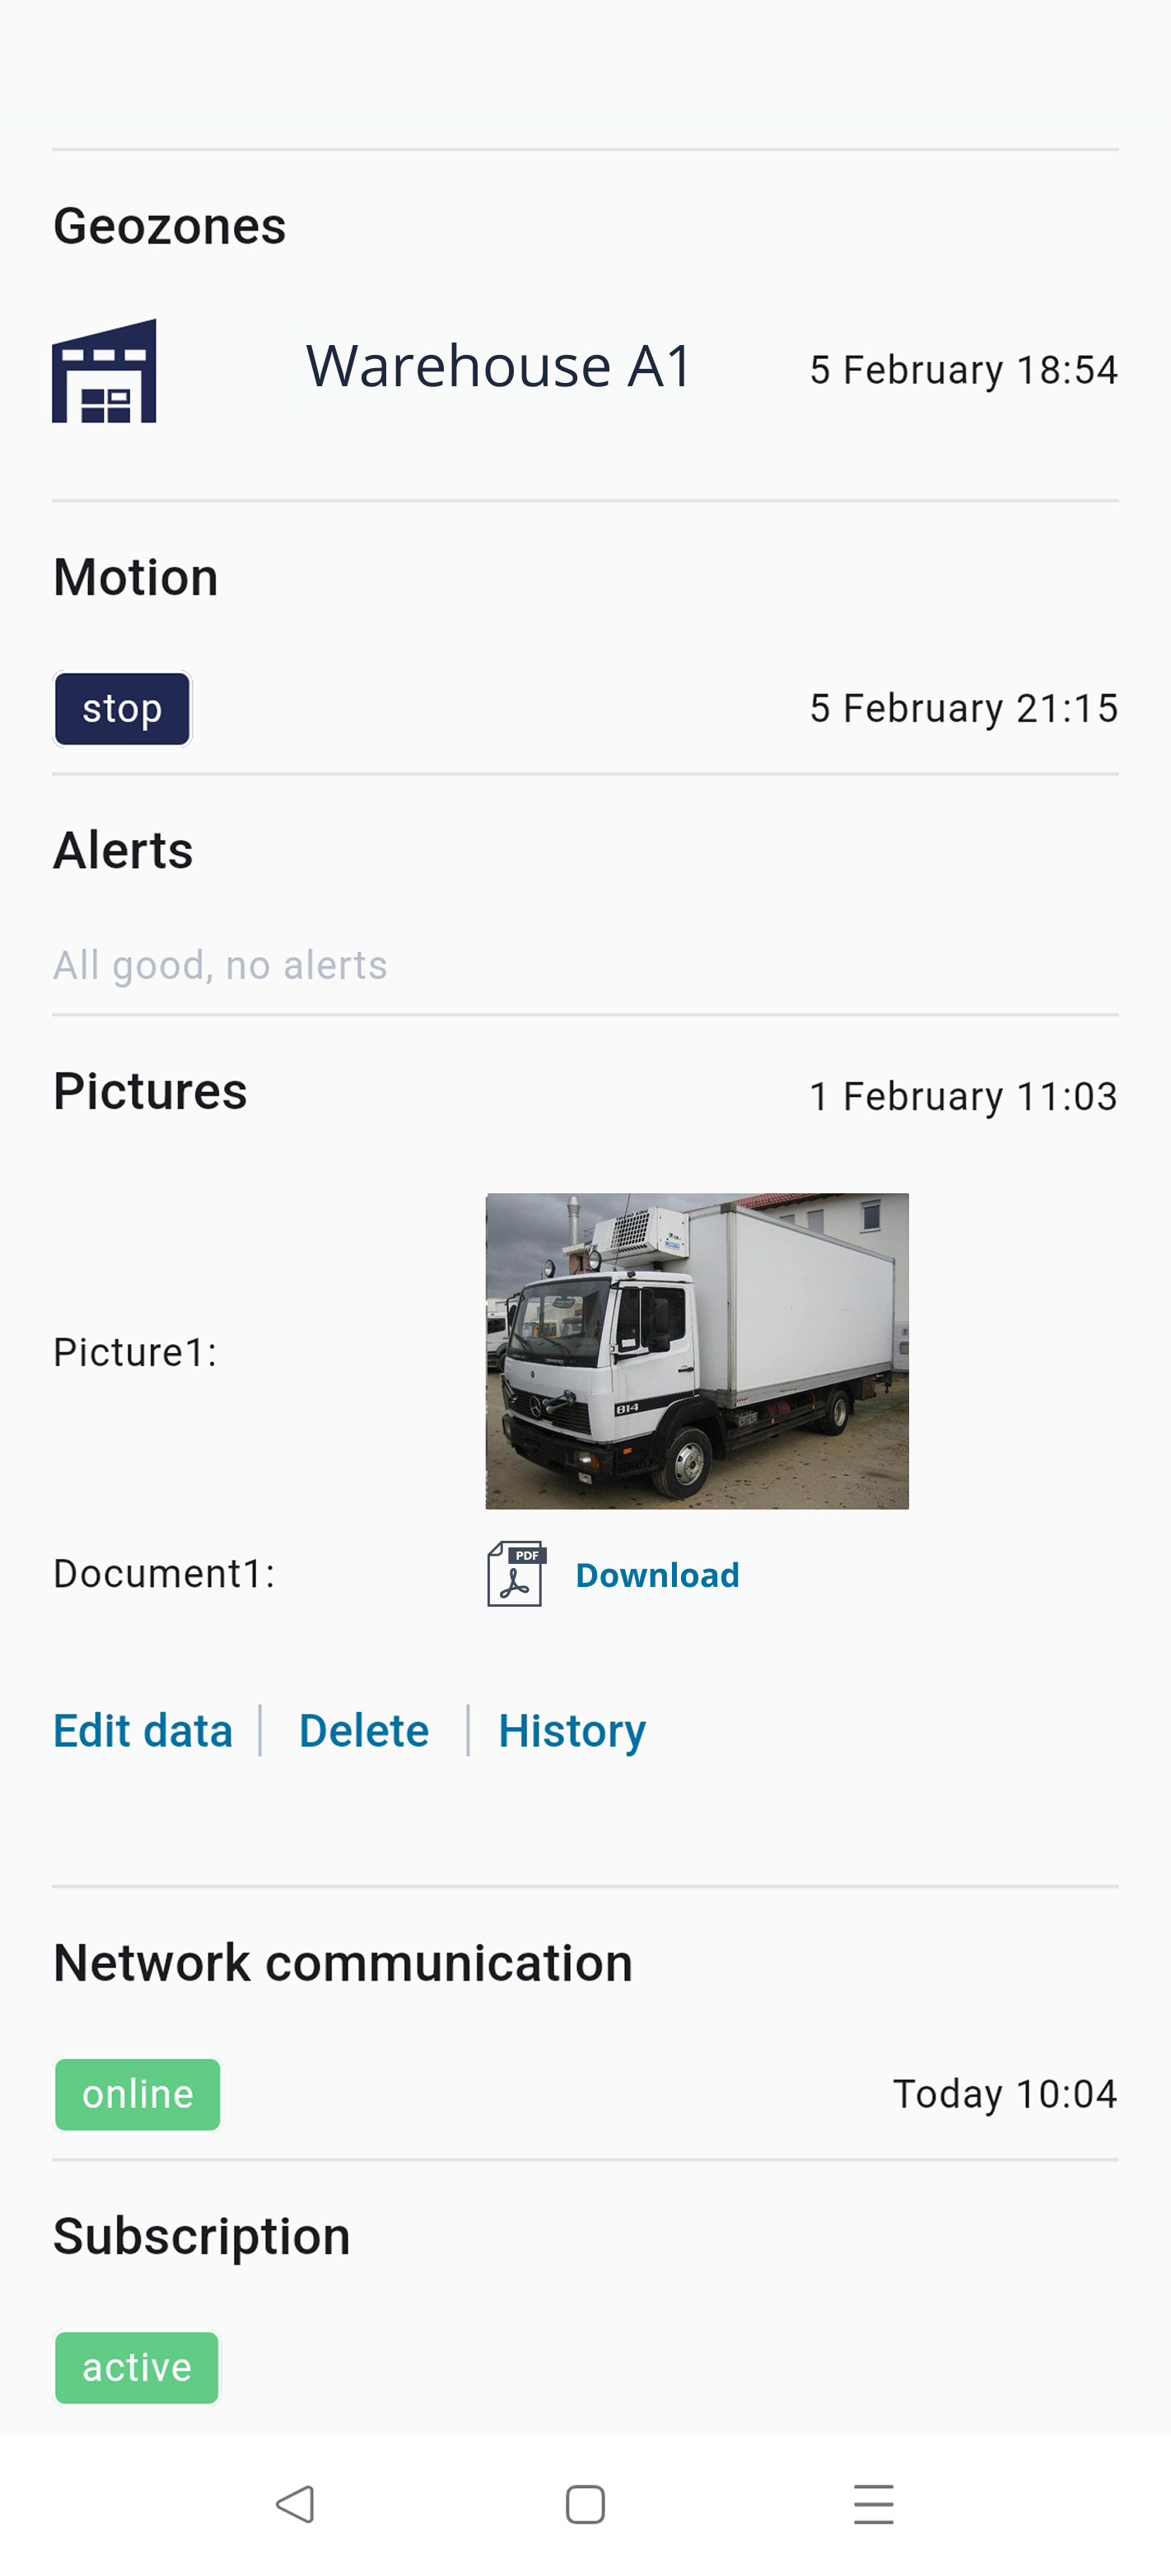
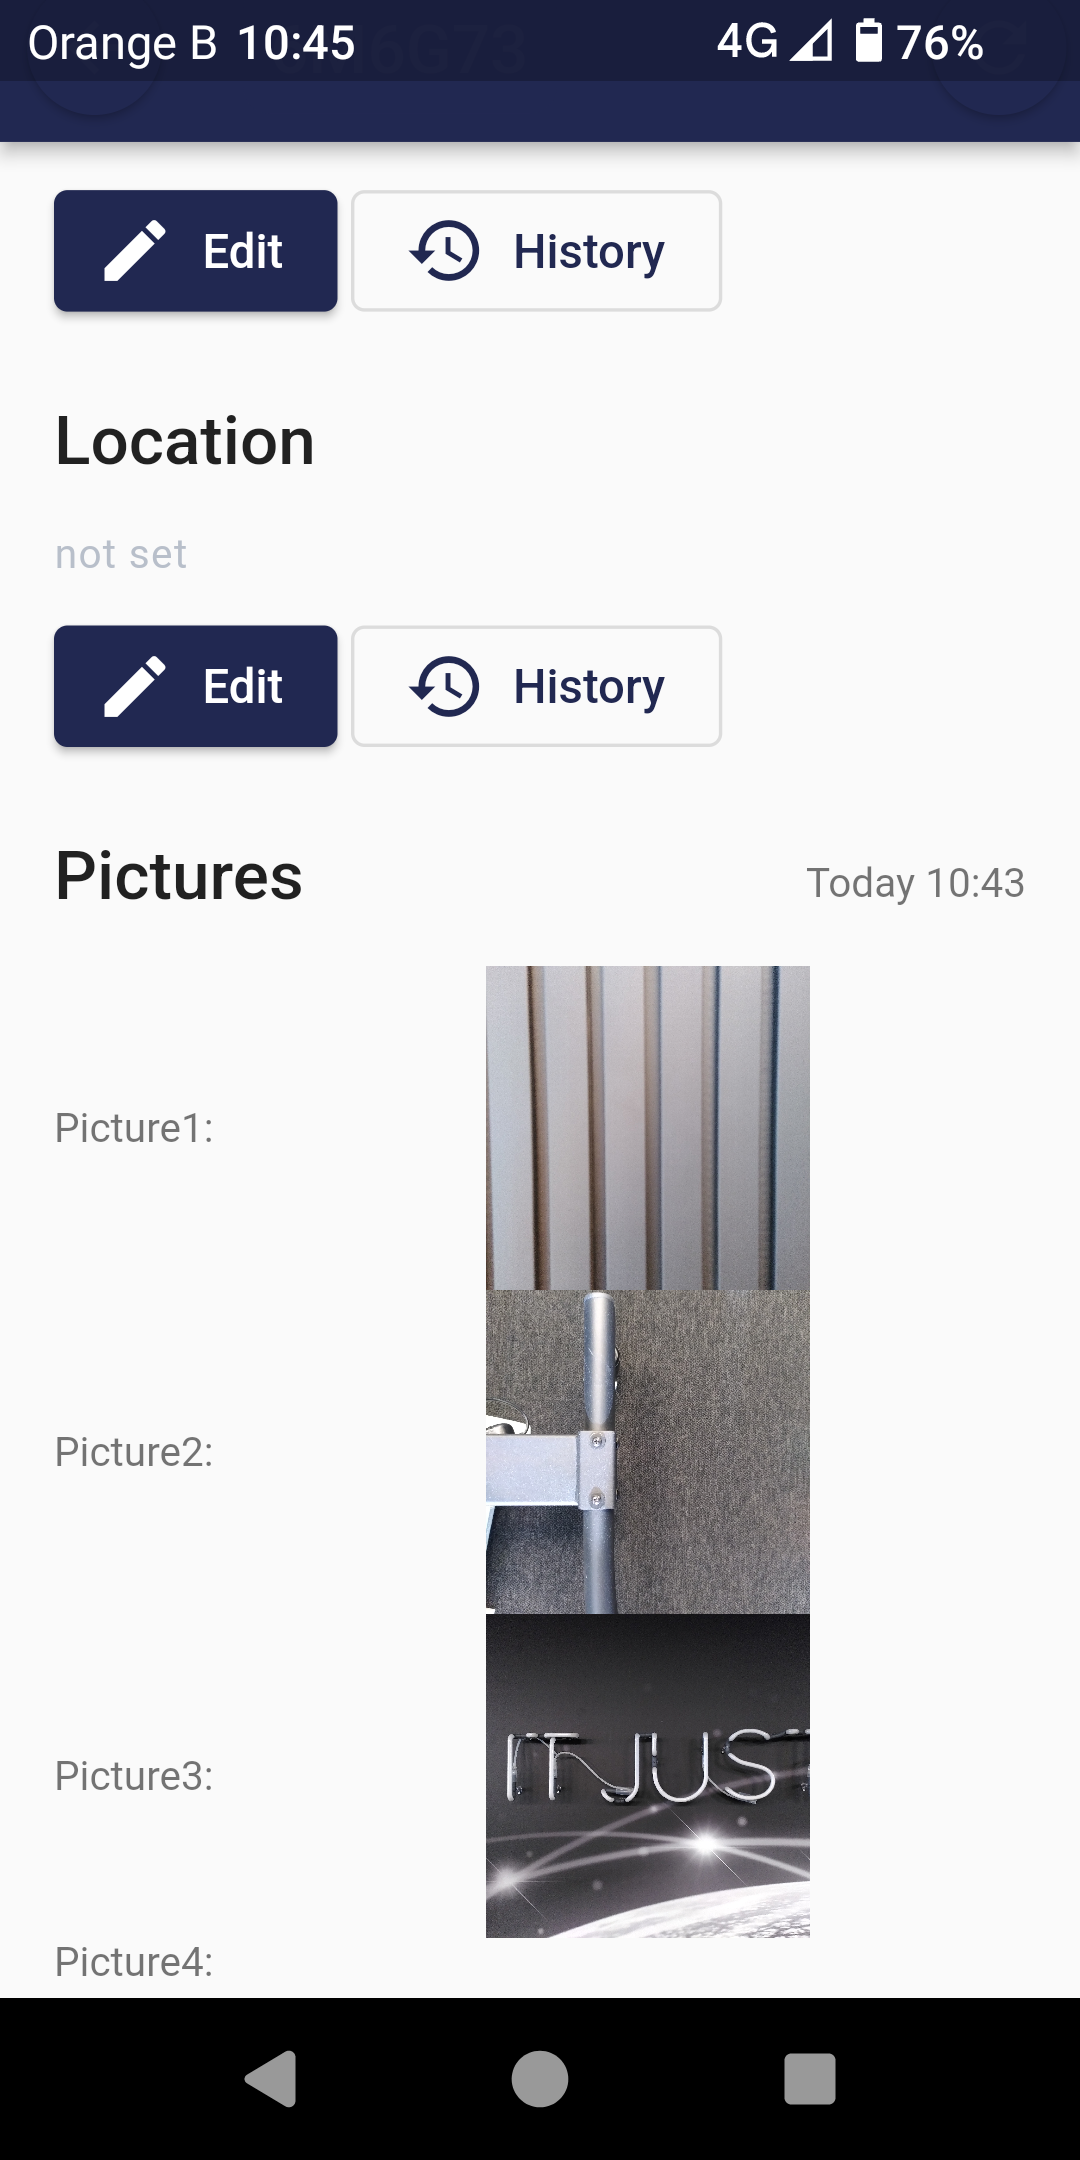
Example to upload images via mobile app
{
  "$schema": "http://json-schema.org/draft-04/schema#",
  "description": "Pictures",
  "title": "Pictures",
  "type": "object",
  "properties": {
    "Picture1": {
      "contentMediaType": "image/png",
      "description": "picture 1",
      "contentEncoding": "base64",
      "type": "string",
      "signature": false,
      "order": 1
    },
    "Picture2": {
      "contentMediaType": "image/png",
      "description": "picture 2",
      "contentEncoding": "base64",
      "type": "string",
      "signature": false,
      "order": 2
    },
    "Picture3": {
      "contentMediaType": "image/png",
      "description": "picture 3",
      "contentEncoding": "base64",
      "type": "string",
      "signature": false,
      "order": 3
    },
    "Picture4": {
      "contentMediaType": "image/png",
      "description": "picture 4",
      "contentEncoding": "base64",
      "type": "string",
      "signature": false,
      "order": 4
    }
  },
  "required": [
    "Picture1"
  ]
}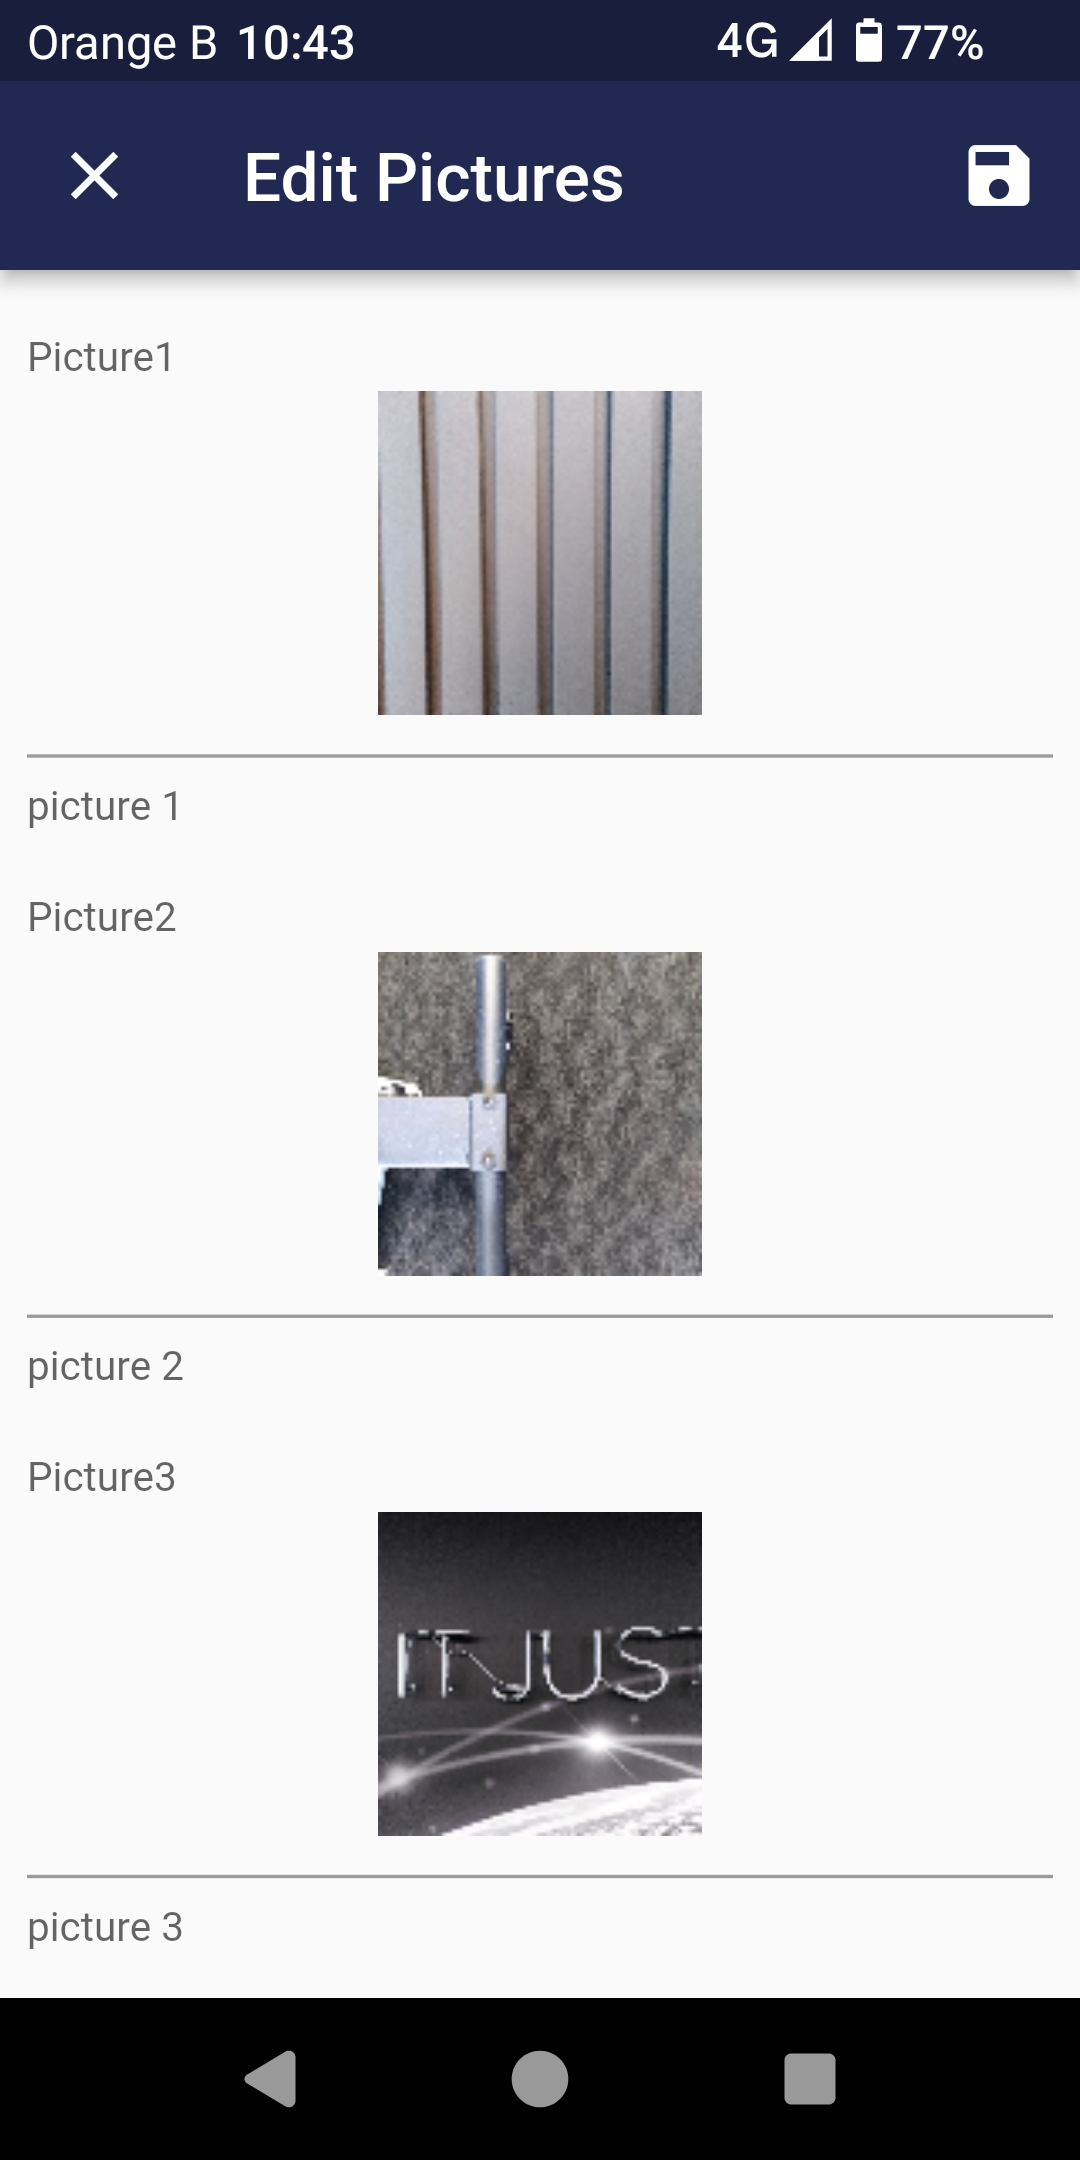
Don't forget to click ![]() to save the information
to save the information
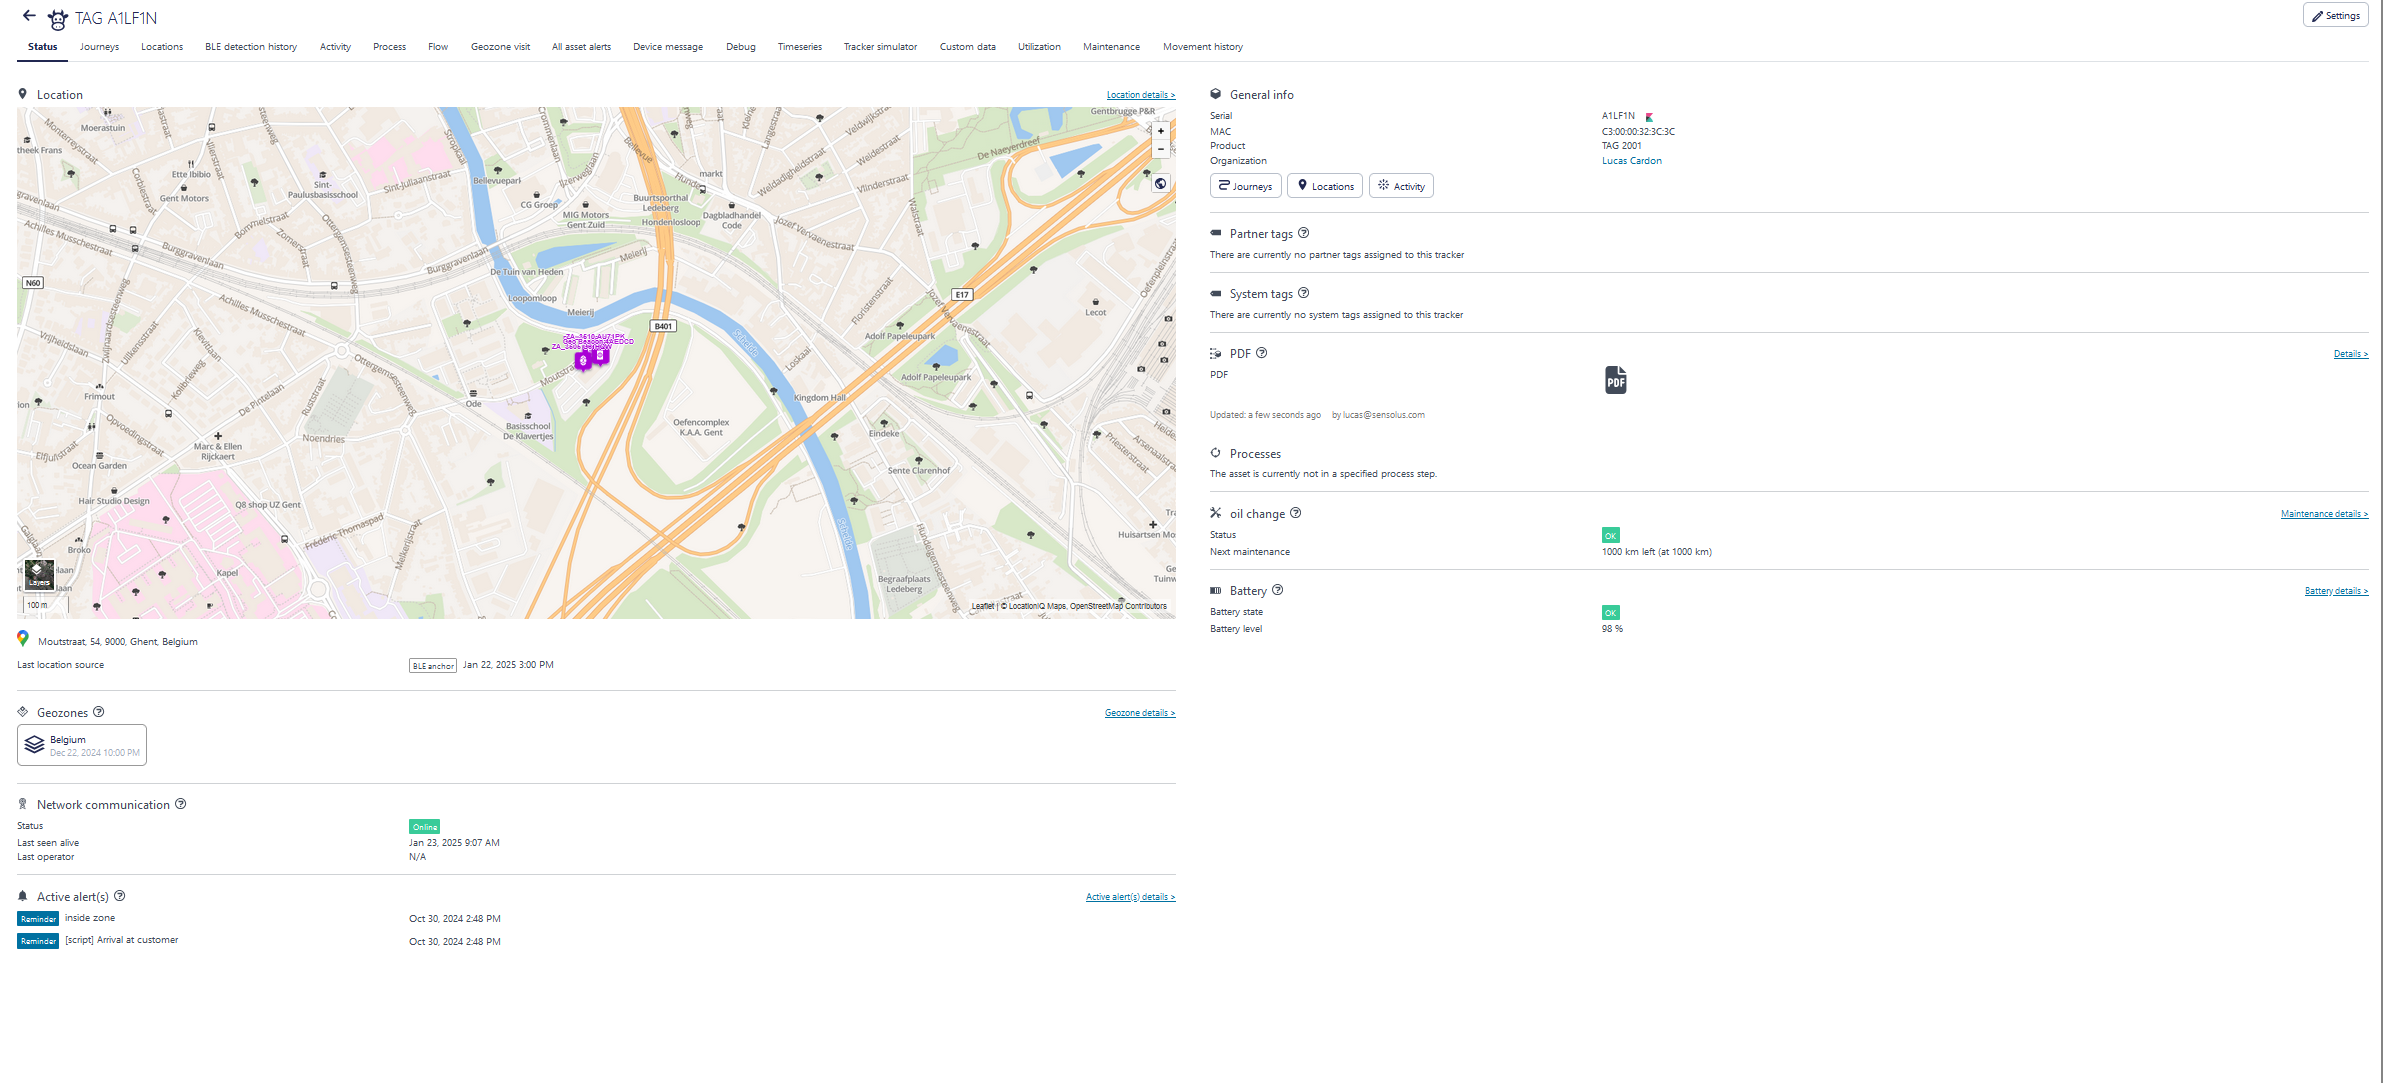
Once filled in it will be shown on the asset details
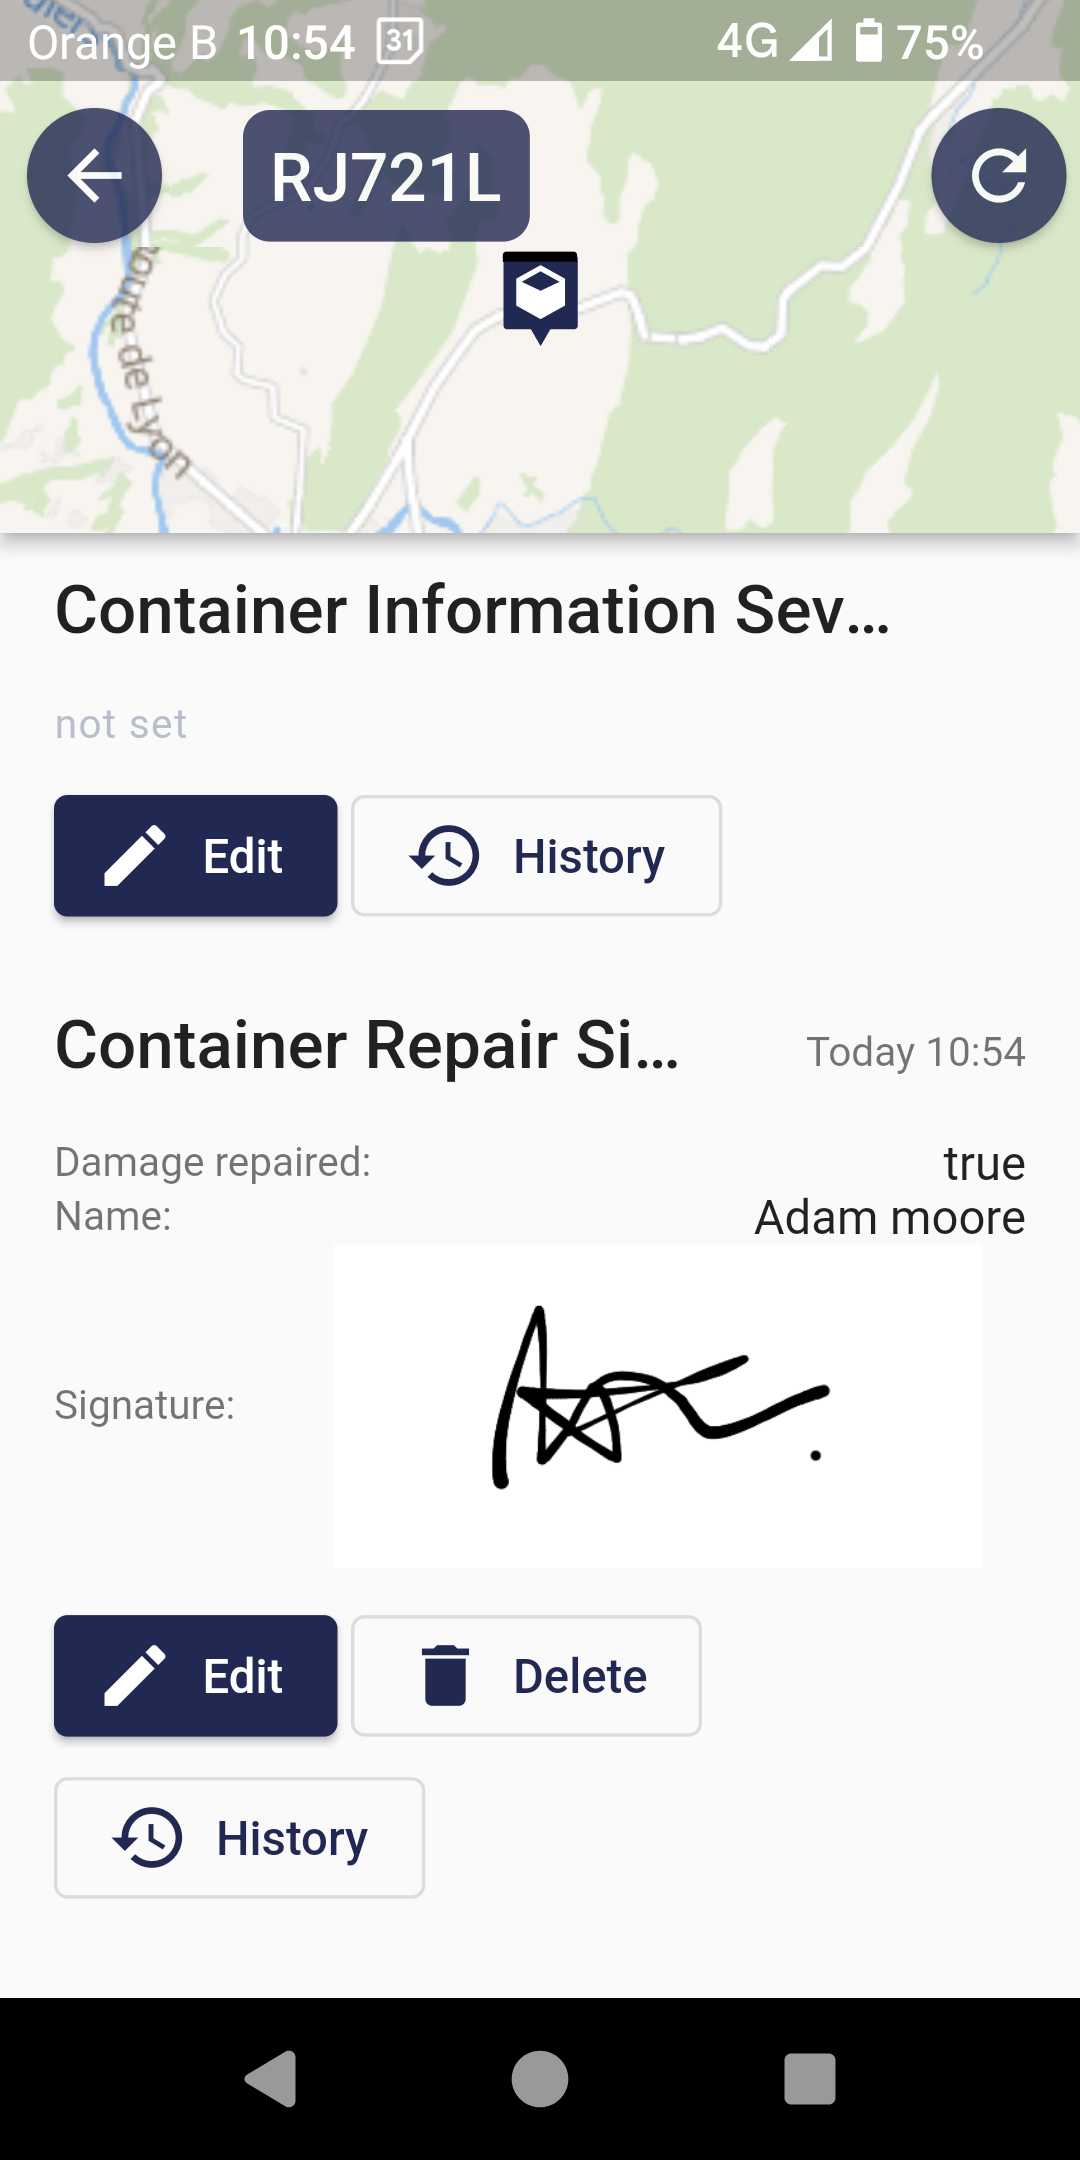
Example to add signature via mobile app
Example JSON schema to use to add custom data channel to do a sign-off / set a signature via the mobile app.
{
  "$schema": "http://json-schema.org/draft-04/schema#",
  "description": "Container Repair Sign-off",
  "title": "Container Repair Sign-off",
  "type": "object",
  "order": 2,
  "properties": {
    "signature": {
      "title": "Signature",
      "description": "The signature of the person that performed the reparation",
      "contentMediaType": "image/png",
      "contentEncoding": "base64",
      "type": "string",
      "signature": true,
      "order": 3
    },
    "damage_repaired": {
      "title": "Damage repaired",
      "description": "Confirm damage repair",
      "type": "boolean",
      "order": 1
    },
    "name": {
      "title": "Name",
      "description": "The name of the person that perfomred the reparation",
      "type": "string",
      "order": 2
    }
  },
  "required": [
    "damage_repaired",
    "name"
  ]
}
On the mobile phone the form looks as following:
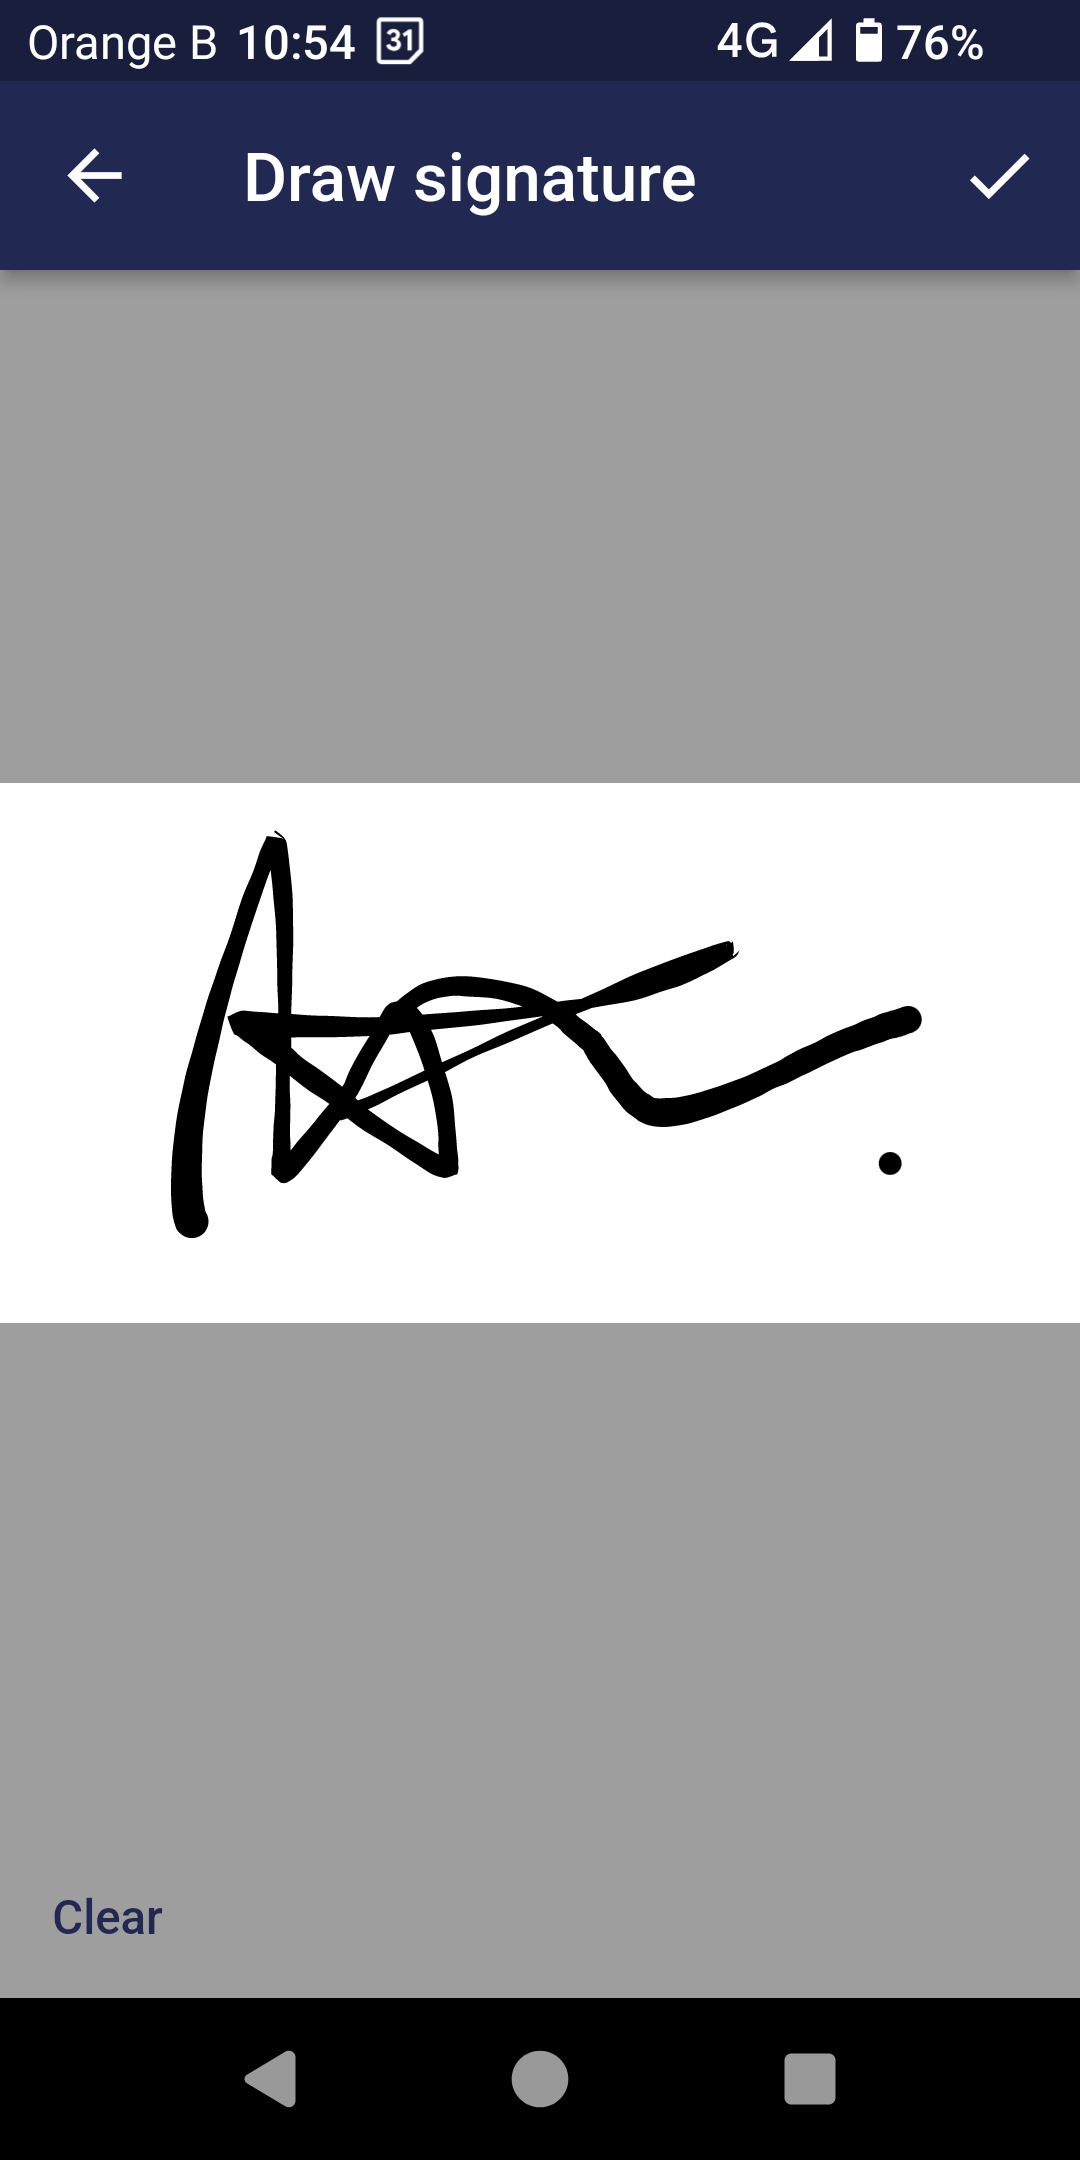
Here you can draw your signature using a digital pen or your finger. click the ![]() button to save the signature.
button to save the signature.
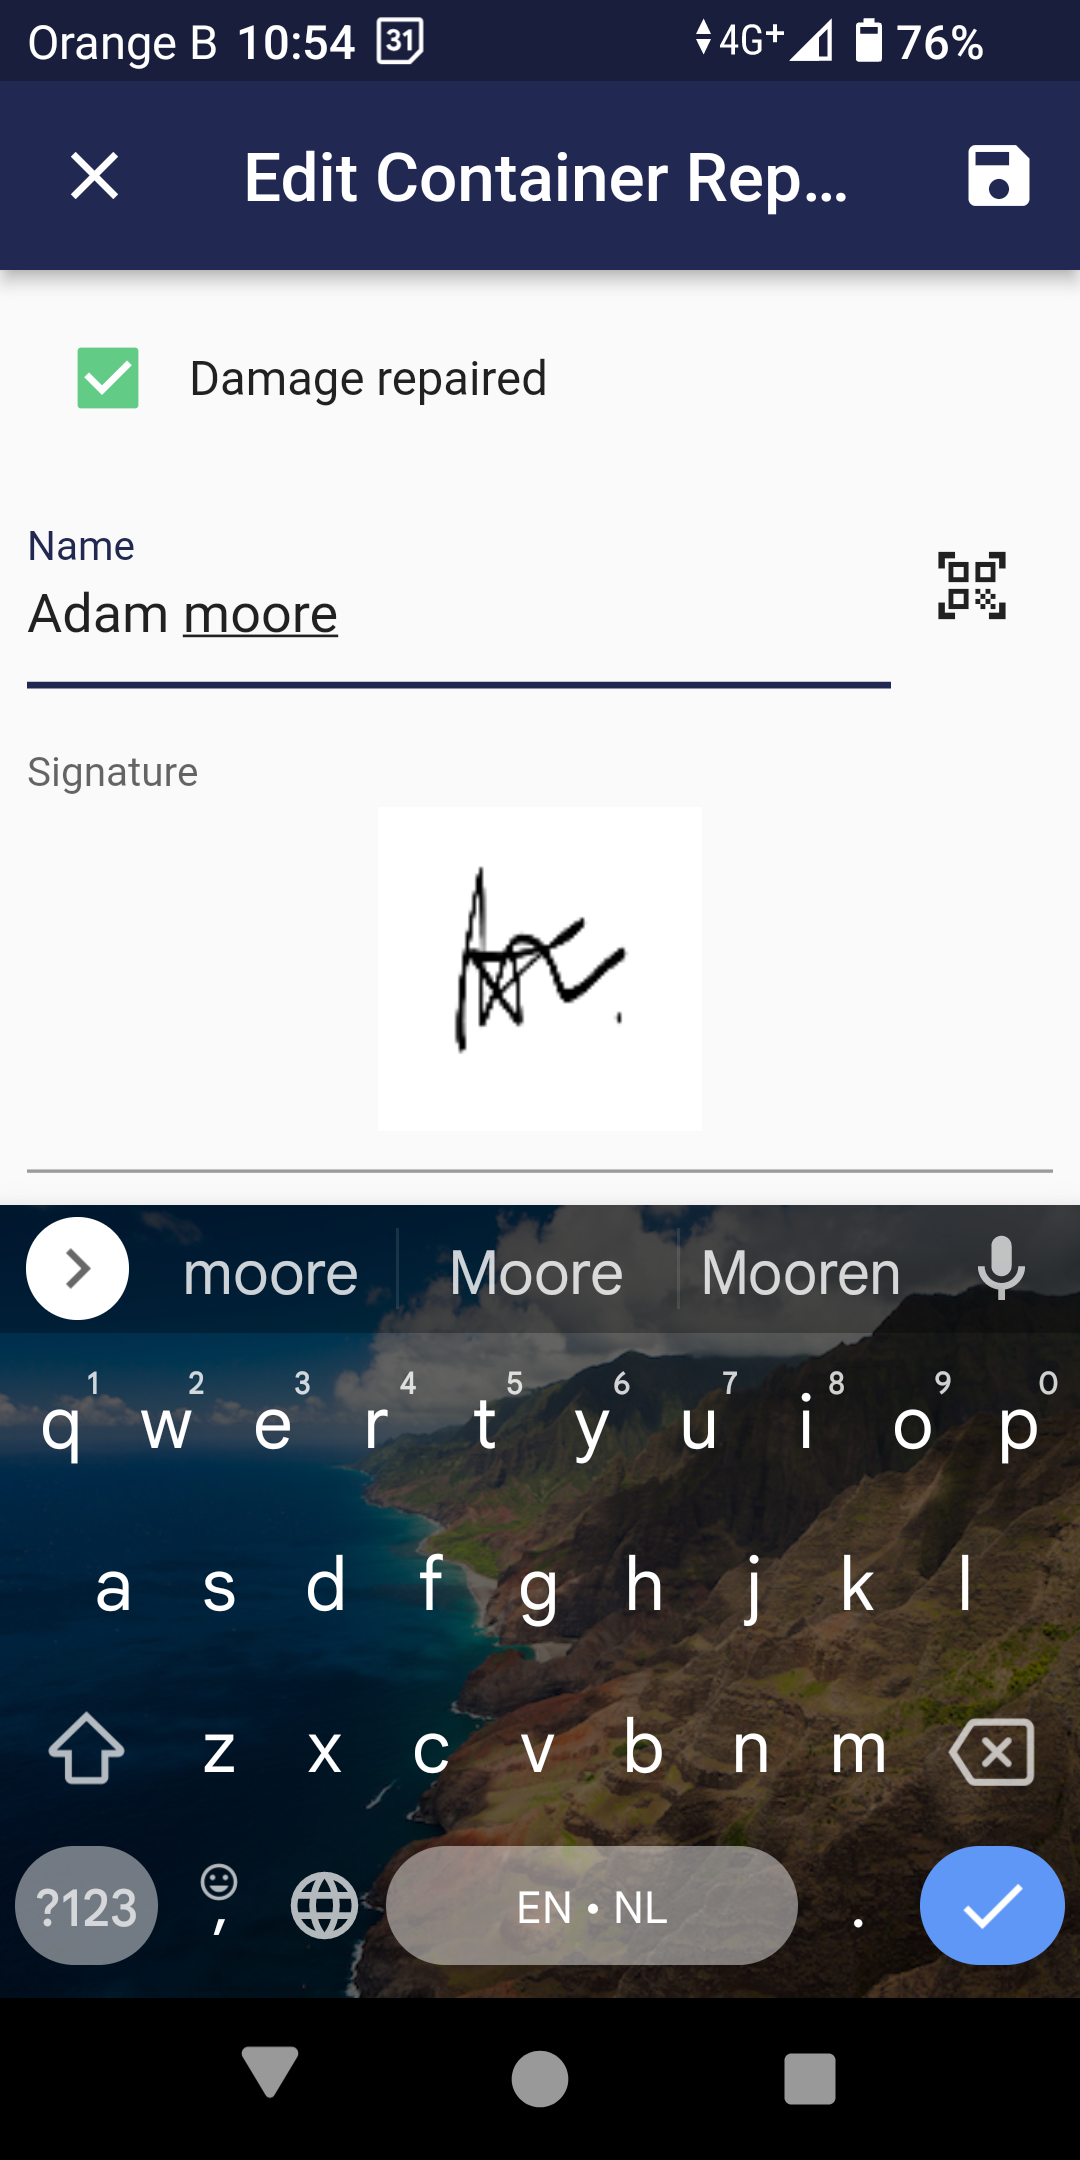
Don't forget to click ![]() to save the
information
to save the
information
Internationalization of custom data
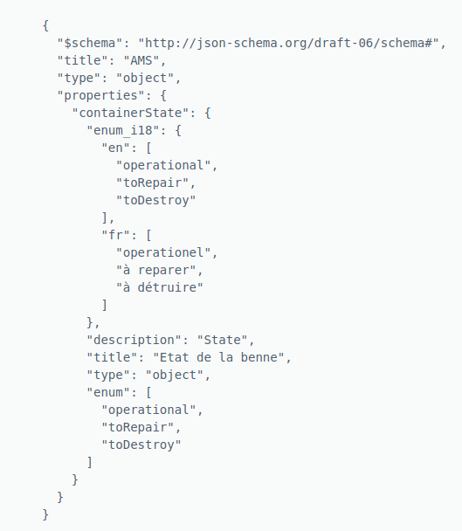
Custom data is available for different languages. To make this available Sensolus provides internationalization support, also for third party enum types. In the visual below you see an example how to define an internationalized enum property in the channel descriptor. The enum_18 field should contain the translations of the set of enum values in the designated languages.
The property that should be internationalized is modeled as an ‘object’ with “i18n:true”.
The transplantation will be processed as follows:
- Find the title/description of property in the language of the user if defined, other ways the language of the organization
- If not found use the default label of the property

Clickable URL's in custom data fields
The format type for clickable URL's is "URL".
Users can push a URL to this field and the UI will render it as a link.
- link has to follow the format URI in RFC-2396 <https://www.ietf.org/rfc/rfc2396.txt>
- label as string will show as replace of the link (optional)
- tooltip shows when hovering to the link (optional)
Example to add clickable URL to custom data field
Example JSON schema to use to add custom data channel to do add an URL.
{
    "$schema": "http://json-schema.org/draft-04/schema#",
    "description": "Shipment information RTP",
    "title": "Shipment information",
    "type": "object",
    "properties": {
        "LogisticsProvider": {
            "description": "Logistics provider",
            "type": "string",
            "order": 3
        },
        "Address": {
            "description": "Delivery address",
            "type": "string",
            "order": 2
        },
        "Link": {
            "description": "link to website",
            "type": "string",
            "format": "url",
            "order": 5
        },
        "Content": {
            "description": "Content",
            "type": "string",
            "order": 4
        },
        "ShipmentNumber": {
            "description": "Shipment number",
            "type": "string",
            "order": 1
        }
    },
    "required": [
        "LogisticsProvider",
        "ShipmentNumber",
        "Address",
        "Content",
        "Link"
    ]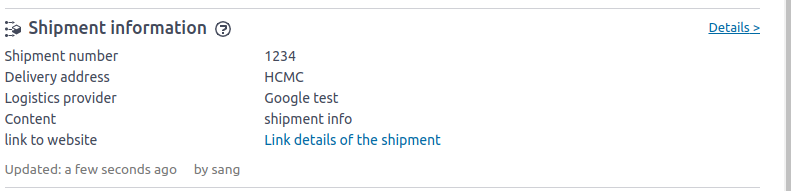
}{
"LogisticsProvider": "Google test",
"Address": "HCMC",
"Content": "shipment info",
"ShipmentNumber": "1234",
"Link": "https://google.com"
}This results in the following output:
Example to upload PDF via custom data channel
{
"$schema": "http://json-schema.org/draft-04/schema#",
"description": "PDF",
"title": "PDF",
"type": "object",
"properties": {
"DocumentPDF": {
"type": "string",
"contentMediaType": "application/pdf",
"contentEncoding": "base64",
"description": "PDF",
"order": 1,
"signature": false
}
}
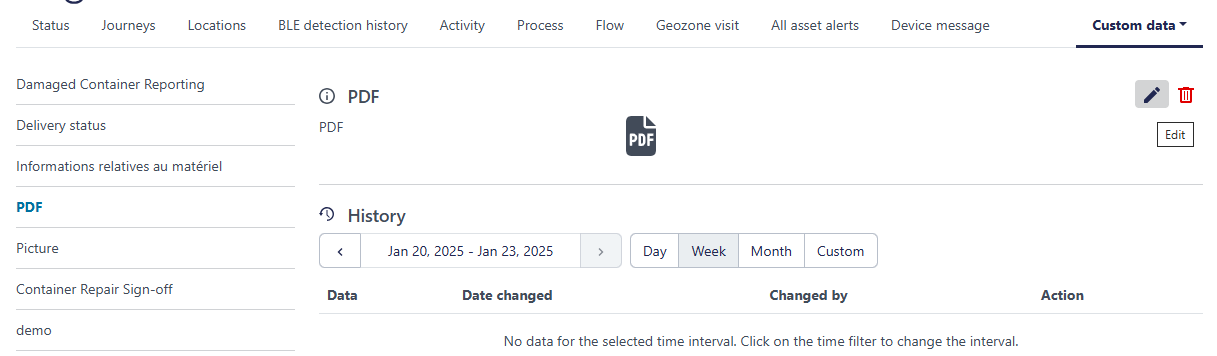
}Once the channel is created, on the interface the interaction looks like this. You are asked to upload or edit a PDF.
To edit the PDF, you can just upload a new file.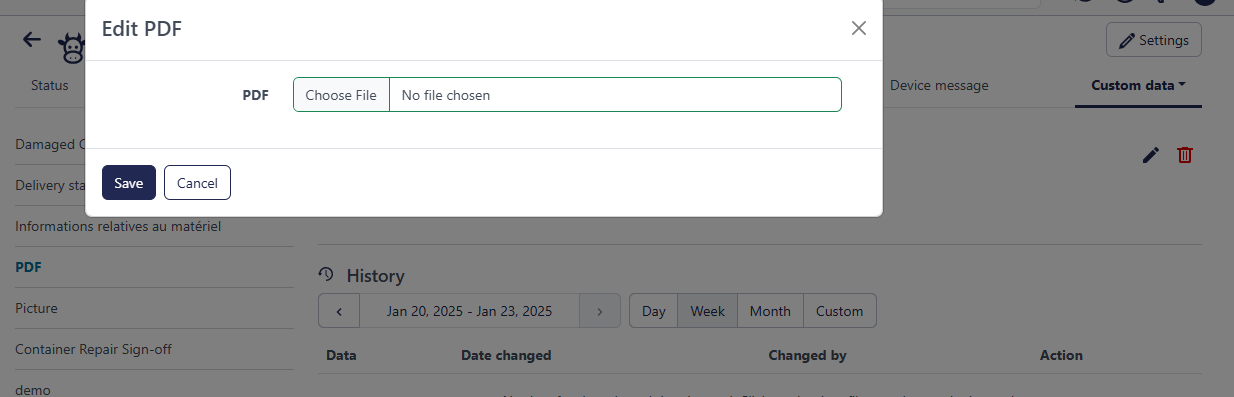
Once filled in it will be shown on the asset details page like this: